Sunday, March 31, 2013

Battle of Sabugal


After my quick tour of Almeida, I hit the road for Sabugal.  I had read a detailed account of this action in Mark Urban's splendid book "Rifles", and the location was just off my route southwest to Coimbra and the battlefield of Bussaco.

Sabugal is a quaint little town in a bend of the River Coa, with an old Moorish castle, and small baroque citadel, surrounded by wooded hills. All very nice, but a sign or some directions indicating where the battle was? - none! I drove around for about 40 minutes trying to work out the location of the battle from an old map, but no luck. Eventually a quick stop in a café/bookshop/museum by the castle got results. 


The shop was partly dedicated to (and possibly run by) the local Jewish community who had survived hidden with false identities for hundreds of years, praying in secret whilst outwardly pretending to be Christian. Anyway, the people I met were extremely friendly and helpful; real ambassadors for their town and region.


On a shelf in the shop was a small display of buttons and musket balls, and one cannon ball. When I asked the owner where she got the cannonball, she replied that she had found it herself, and more importantly at the site of the battle, and that she had arranged two years before for a small commemoration memorial to be built there. So instructions in hand I made my way out to the battlefield.


To get there, you have to drive out the main road Southeast from Sabugal to Quadrazais. When you reach the outskirts of Sabugal you will see a sign on the right pointing to Teixedas; take this turn. 


The road is basically a metalled track, so if the road looks dodgy, then you know you are going in the right direction. Follow the track for about 1.5 km past a few houses and farmhouses and then through a small forest. 


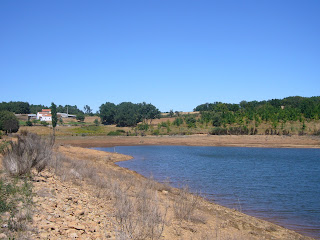
The memorial to the battle field should be at a small T junction, just as you come out of a copse of trees. In the background you should see a large resevoir, which is a dammed section of the Coa (and where the Light Division crossed and ascended the hill to meet the French).


The battlefield doesn’t seem to have changed that much, though as mentioned, the river Coa is now a dammed lake in this part, so it’s hard to tell what the original crossing point would have looked like (obviously a lot lower down than the current water’s edge). The land is partly farmed and partly forested, though I am not certain of much forestation there was in 1811 (for example, the hill at Bussaco, which is heavily wooded now, was completely bare of trees at the time of the battle).

Looking across the line of the French position.
 

Looking from the French lines down towatds the River Coa. This was the ground the Light Division had to cover during their attack (or as they blundered into the French during the early morning fog).
 

I drove down to where the Coa would have flowed, and you can see that it is a long open climb up to where the French positions would have been. If open at the time this would have been a long bloody walk. 
 

Looking up to the memorial from near the river.

As it is, the hill is deceptively steep. If the French had been fully deployed when the Light division encountered them, then Beckwith's Brigade of the Light division would have been in trouble (though such an engagement/sacrifice may have enabled the main British Force to bag the Reynier's men). As it was, beckwith's Brigade found itself hanging on against odds of 5 to 1. Only the eventual crossing of the Coa of the Drummonds Brigade, and emerging on the right of Beckwith held the day, in addition to reynier catching sight of Wellington's main force making its way through Sabugal, and wisely ordering a general retreat before he was trapped.


The Coa today in this part is now dammed, creating a partly flooded valley. The original ford is probably somewhere in the mid-distance in this photograph.


Apart from the higher level of the River Coa, the land is largely unchanged. There is nothing in the way of any interpretaion of the battle at the site apart from a small brass plaque. Still it is worth a visit and is an easy day trip from Ciudad Rodrigo.




Saturday, March 30, 2013

Happy Easter

Happy Easter to all from an unseasonably cold Prague. People normally wager if there will be a white Christmas; at the moment it's evens that it will snow on Easter Sunday (feck!). Given my Central European location I thought a German and Austro-Hungarian motif appropriate (I couldn't find a Czechoslovak Legion Easter greeting yet...)

Whilst talking about subjects German, I've just finished what I consider an excellent book by Christopher Duffy; "Through German Eyes." It examines the German view of how the British actually fought at the Somme, by some excellent research of primary sources in the German military archives (mostly intelligence reports from the interrogation of British Prisoners, and other reports). What's especially interesting is that it turns the accepted historiography of the Battle of the Somme on its head, and shows that the Germans actually felt they were extremely lucky not to have been defeated (and came close to that on a few occasions).


I will try to give a fuller review in the coming days when time allows.


Wednesday, March 27, 2013

Experimental rule for Pike & Shotte - Black Powder

I  just received the latest edition of the Arquebusier journal from The Pike and Shot Society. This is really an excellent publication focusing on Renaissance and late Renaissance warfare up to the early baroque period of Marlborough (there were still pikes floating around the Baltic at this stage). I can't recommend it highly enough.

Anyway, the point of the post is that one of the articles focuses on a proposed army list for the English Civil War ("An Experimental Army List, Royalist Oxford Army, Newbury Campaign" by Charles Singleton). What caught my attention was the last paragraph with an interesting rule change for the Pike & Shotte Black Powder armies for the ECW/TYW period, which I quote below:

"Experimental rule for infantry - a suggestion - In order to reflect the much closer co-operation between pike and shot in the first half of the seventeenth century, remove the pikeman listing from the army list and add 'pike company' special rule to musketeer listings. This would increase the cost of musketeers from 44pts to a base of  49pts. Simply depict them as a pike block with two wings of musketeers."


Now I don't own a set of the rules, but have read through a friend's copy and found that I couldn't agree with the separation of pike and shot into what seems like separate units. I've reenacted the period, read through contemporary drill books, and wargamed with Forlorn Hope. All accounts agree that the regiments acted as one unit - pike block in the middle with musketeers on the wings. The ratio of pike to shot varied from campaign to campaign, as well as the formation of commanded shot and dragoon units which fought without pikemen. So it seems to me like a major failing of the rules. The current interpretation of unit formations in the rules as they stand are just wrong in my opinion. If I have misinterpreted what I have seen then I will in due course be corrected :-) Anyway, the experimental rule if expanded on could make Pike & Shotte  a perfectly good set of rules for the pike and shot period.

Tuesday, March 26, 2013

Dux Bellorum Test Game

So after a bit of post-Christmas procrastination I finally  finished my Early Saxon Army for Dux Bellorum (all Gripping Beast except command pack from Musketeer Miniatures), and ticked off one of my New Year's resolutions. In the sense of the Philosopher/Sociologist Bordieu I inflicted a bit of "pedagogical violence" upon myself; that is set myself an agreed date to play-test the Dux Bellorum rules down at the Prague Wargames Club before the army was finished, and thus accept the pain of prolonged painting over a short space of time. Now the bases still need a good and proper flocking... So I'll post up the eye candy when they're ready.

The Saxons lined up on their "muddy" bases.

Anyway, back to the test game. This was our first run at the rules. I'd read them through about twice, but could I remember anything on the day? No. So the rules passed their first test in terms of ease of reference (the booklet is not that hefty), though they would benefit from an index at the back.
My opponent was Pavel, who seemed to remember a few more of the rules, which speeded things up. He fielded his late Roman 32 point army on the day, and had a worrying amount of cavalry that my foot only force would try to deal with.


The set up was intuitive, and a quick dice roll and adding in aggression level of armies decides who is the aggressor and defender (important for the sequence of handing out Leadership Points (LP's) each turn). There are also a list of scenarios you can play at the back of the rules.  Now the LP's are the key mechanic in the game (plus of course a fair bit of dice rolling). The LP's are a bit similar to pips in DBx, but how you distribute them adds a nice tactical element to the game. Your  army gets 6 LP's as a basic (to which additional LP's can be purchased instead of units). You then distribute them at the start of each turn, unit by unit, first the defender (or repeller) awards LPs to one unit or group, and then the attacker (aggressor) and so on. Once awarded they cannot be moved (unless you have an experienced warlord who can reallocate 1 LP at the end of this phase. So if the attacker puts a few points down on the left wings, and the defender matches with more points on that wing,  and the attacker then loads up all the rest of his LP's on another wing, he can outwit the defender, and use the local LP advantage on the other wing to press home an attack.
 
Tracking Cohesion and Leadership points with differently coloured dice (a slight chore in the game).


The LP's are also used to reduce the effect of hits on a unit, and thus reduce the potential damage to cohesion. Once the manoeuvring is over and the units get into slogging at each other, this is where the LP's start to be used. Once you get enough hits and a units' cohesion goes to zero, then it is removed from play. Each unit removed also removes one LP permanently from the game for that side. I'm sure there are multiple strategies to be discovered in using the LP's (as well as learning the rules fully). 

The rules gave a satisfying game, and we almost got to a conclusion after just 2 hours of this first game (the better protected late Romans were pushing back the Saxons, who had 2 units of more brittle warriors/warband about to lose their cohesion, and be flanked at the same time by the Roman Cavalry). They felt "right" in regard to a dark ages battle, with some manoeuvring before the battle develops into a slogging match. This though does not last for too long as the hits quickly start to reduce cohesion points, so at one moment several units can melt away at once (simulating an armies breaking point and devastating rout). I'll write some more on the rules once I have fully digested the trial game, and get a few more games in over the coming weeks; but full marks so far.


Sunday, March 17, 2013

Happy St.Patrick's Day


Just to wish you all a happy St. Patrick's Day. Now this a a great day for meeting up and having a pint or two and talk about home (if you are a member of the Irish diaspora such as myself). With a 1 year old to get to bed, thoughts of a Paddy's Day pint in the pub will have to wait for next year, though I did at least manage to sneak in a symbolic Guinness.


On the subject of things Irish, I also recently managed to pick up a copy of "Irish Battles: A Military History of Ireland" by G.A. Hayes-McCoy. I will in due course post up a review, but even from a quick read of some of the chapters it is clear that this is a first rate piece of work (the book is regarded as a classic on the development of warfare in Ireland).


For example the chapter on the Battle of Benburb includes a lot of material I hadn't seen elsewhere, and certainly the best map of the battle. The book ranges from the Battle of Clontarf in 1014, through to the Battle of Arklow (1798), taking in some rather well know "bashes" such as Yellow Ford, Kinsale, Rathmines, The Boyne and Aughrim, plus several other lesser known battles. There are other missing battles which more recent research has provided fuller details on (such as the Battle of Clonmel when Cromwell's New Model Army suffered probably it's only defeat, or bloody stalemate if you feel generous). Very much looking forward to ploughing through this over the coming week, and seeing what inspiration I can find for a Confederate Wars scenario.